How To Create an Area
- Create a folder for your area. This folder is primarily for your area, and will host all the lightmap data, and you can put any area-specific assets in here as well.
- Create your area in your scene or as a new prefab.
- Nothing should be place directly under the root. You should create childs GameObject to put everything you need under it.
- You can place models, scripts (like ropes and CreatureSpawners) and other normal level assets. Unity Terrain is not supported.
- Create a JSON for your Area and reload Json in unity.
- Add the Area component to the root of your room.
- Select the area component and set the “Area ID” from the Json file.
- Once done, add a LightingGroup, AreaLightingGroupLiteMemoryToggle, NavMeshSurface and ItemSpawnerLimiter.
-
Add AreaGateways so that your rooms can connect eachother. It is recommended that no models go past this gate, as they will be visible in other rooms, or the collider can block progress in other rooms also.
Under the prefab root, create a child name Gateways.
For each connection you have in your area, create a new game object as child of the Gateways GameObject.
-
change its coordinate so it is at the connection position, and rotate it so the Z axis face the outside of the area.
-
Add the AreaGateway Component to it. See Area Gateway
When all gateway are setup, select the Area component and clic the “Update Data Connections And Direction” button. This will update the AreaData json file
Open the Area Json file and set the connection type on all connections (the connection order in the Json file should match the order in unity). Reload Json files after.
For each AreaGateway you made :
-
Setup the LocalBound of this component (value or with gizmos). When the player enters this box it will fade the fake view and set active the adjacent Area. Note that this box should not overlapp other gateway box to avoid the player beeing in 2 gateway at the same time.
-
Click on the SetupFakeView button.
-
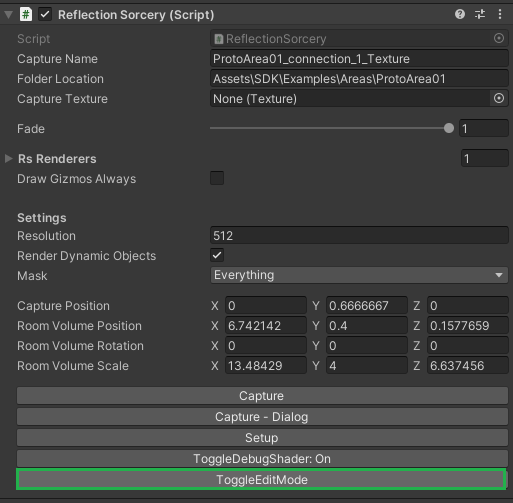
A GameObject called reflection sorcery should appear as a child. Select it and click on the ToggleEditMode Button.

A GameObject named Room Volume appears, it’s a box on the prefab scene, edit it so it fits to the near wall. Then Click on ToggleEditMode button on reflection sorcery again.
-
- Select the Area Component and click the “Update Data Bounds” button. This will update the JSon file.
- You should see a purple box surrounding your area. You can edit the JSon file to update this bounds if needed.
- Note that the box should always stop exactly to Gateway and that there should be no active collider outside this box. (This could create invisible colliders in other areas).
- Now, make your Area a Prefab in the Area folder you created earlier. This room will now lock. Every edit in the scene (not prefab) will not work on the room unless you unlock the room (unlock button in the hierarchy) and override prefab once your change was complete.
- Create an Addressable Asset (see Addressables Documentation) and place your Area on to your new Addressable. Name it something that fits, add the “Windows” (or Android for Nomad) and “Areas” Labels to it.
- Next, go to the “AreaTest” scene and place your room. Ensure that the room is placed at the origin (0,0,0).
- Under your parent gameObject, under the NavMeshSurface, change the “Include Layers” to “Default” and “LocomotionOnly”, and for “Use Geometry”, set it to “Physics Colliders”. Then, press Bake. The room MAY lock itself, unlock it to keep editing.
- Once done, go to the top left of your Inspector while on the parent, and apply all changes. The room will lock itself.
- Set up Light Probe Volumes and make sure that they go to each Area Gateway or past it so it can affect the Door Blockers.
- Unlock your room to edit once more, and create a “Lighting Data” (Right Click > Create > ThunderRoad > Levels > Lighting Data)
- Add the lighting data to this component, such as the directional light direction, fog, light color, etc. Place this lighting data in the “Lighting Group” script you placed on the parent earlier.
- Make that LightingPreset an Addressable by placing it under either a new addressable packed assets, or the same one for the area you made. Name it something appropriate with the Windows/Android tag, and reference it in the Area JSON.
- Open the Lighting window (Window > Rendering > Lighting). You now will bake your room.
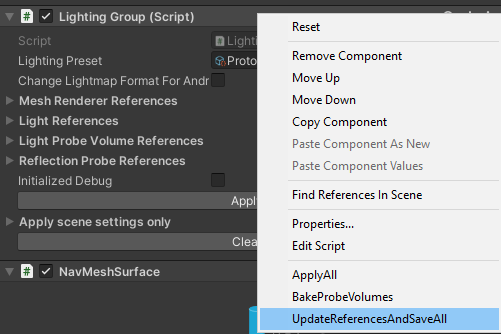
- Once complete select the Area in your scene again. On the LightingGroup, right click it and select “UpdateReferencesAndSaveAll”.

- Apply all the changes to the prefab. The Area should be locked again.
-
Unlock the area and select each AreaGateway again. Under it, on the AreaGateway component, click on the “BakeFakeViewData”, it should create a FakeViewData file in your Area folder.
-
Once complete, make that FakeViewData Addressable by placing it under either a new addressable packed assets, or the same one for the area you made.
-
Name it something appropriate with the Windows/Android tag, and reference it in the Area JSON.
-
Make sure that the fake view matches the connection you place them under, so that they show the correct fake view in play. After this, the room MAY lock itself, unlock it to keep editing.
-
-
Open the area prefab.
-
Select LightingGroup component and set lighting preset to None. (note that you will need to add it again if you need to rebake the light).
-
Select the Reflection Sorcery Component under each gateway. Make sure the CaptureTexture is set to None.
-
You can close the prefab and save it.
-
- Go to the Area JSON, ensure that all of the references are correct and positions/scales of the room and its’ gateways are correct. “IsUnique” ensures that your room can only spawn once in a run, while “allowedRotation” allows different rotations of the room. You should set it to allow 4 rotations (Front, Back, Left, Right).
- You can now add your Area to the AreaTables, to allow your room to spawn
Don’t forget to add a PlayerSpawner in your Room. This is a requirement for if your room is a “Start” room, or if you want to debug your Area. See Player Spawner.
If your room is an “End” room, you’ll want a way to get back home. You can do this utilising an EventLoadLevel and any sort of Event (e.g. Zone)