Creating Items
In this guide, it will show you an in-order guide to creating your own weapons.
Contents
Getting Started
First, you will want to install the SDK (recommended using GitHub Desktop) on the Unity version 2021.3.38f1 (recommend installing on Unity Hub).
For good practises, it is recommended to create a scene just for making items, so that you can save your progress before you turn your item in to a prefab. In your Project, Right Click the Project window, and click Create > Folder to create a new folder for your item. Then, right click again, and press Create > Scene for a new scene.
Next, you will want to add a model to this folder. You can add this model under a separate folder, like in a “sources” folder, and when done so, place the model on to the scene. Drag the basemap texture on to the model, and it will create a material. Change the shader by clicking on the listed shader, and go to ThunderRoad > ASshader - Litmoss, or go to the top bar, click ThunderRoad (SDK) > Tools > Lit To Moss, and in that window, select your material, and you will be able to see a “convert” button. Convert it to get it to the correct shader.
Now, apply your designated textures to Base Map as well as your Normal Map. Go to the Metallic (MOES/MODS/Moss ANSN) tab, set the Mode to 1 so the message below it says MOES rather than MODS, tick Use Metallic Map and then add your MOES map to it.
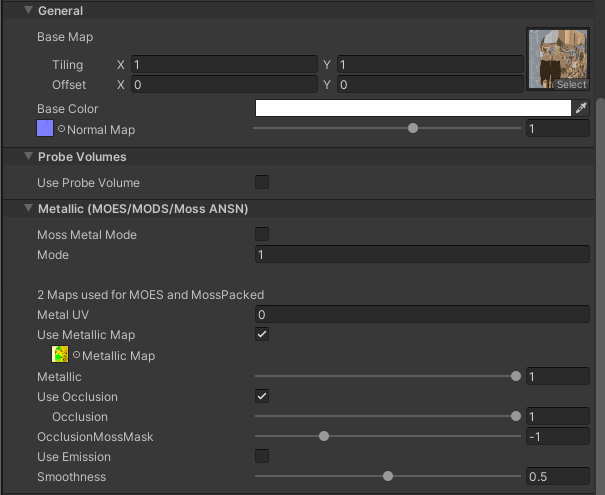
For creating a MOES Map, see LitMoss Guide
Once done, add the script Reveal Decal to the model and tick Use Reveal Layers. Add the textures to it (see Reveal) and then untick the “Use Reveal Layers” afterwards. Reveal makes it so blood and other reveal decals can be applied to weapons when you hit enemies.
You can use the buttons on the Reveal Decal script to set the resolution of the reveal material. It is recommended to keep this as low as possible, but set it high enough on the weapon for the blood to not be blurry.
For examples from Blade and Sorcery:
- Common Dagger: 128x128
- The Maul: 512x512 (256x256 would also suffice)
- Antique Sword: 256x256
- Buckler: 256x256
- Javelin: 128x128
- Wristblade: 128x128
- Old Arrow: 64x64
- The Bandit Chestplate: 512x512 (1024x1024 would also be supported)
It is recommended to keep the reveal resolution low to prevent the game to crash on B&S Nomad, or to cause a lag spike on B&S PCVR. It is recommended not to go above 512x512, or Mask Resolution Quarter, to avoid any issues. You are unlikely to see a big change in resolutions above this point unless your item is very large.
Now, right click your model (or the parent of your model) and Right Click in the Hierarchy > Create Empty Parent. This will create an empty gameObject, which has your model below it. Name this to the name of your weapon, and then click Add Component and add a Rigidbody and Item to the parent.
Finally, at the bottom of the item script, press “Add Default Components”. This will add the HolderPoint, ParryPoint, SpawnPoint and Preview components.

Default Components
Now that youe default components are set up, it is time to configure them.
HolderPoint
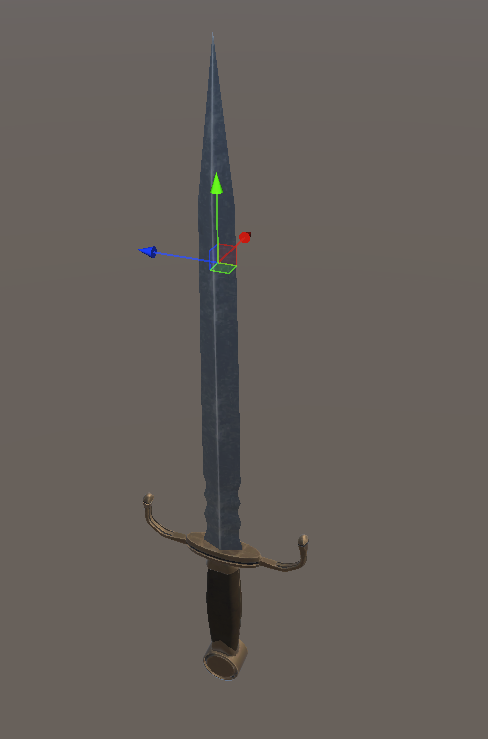
The HolderPoint is the point of which the item will positioned on the Player/NPC body. The blue arrow points down towards the ground, so it is recommended that your item to be positioned like this:

The blue arrow points to the tip of the blade, meaning that the tip of the blade will point towards the floor. The green arrow then points outwards, which points away from the player.
The position of the HolderPoint depicts the centerpoint of which the item will be in the holster.
ParryPoint
The ParryPoint is the point in which AI that use your weapon will attempt to parry your attacks with.
Preview
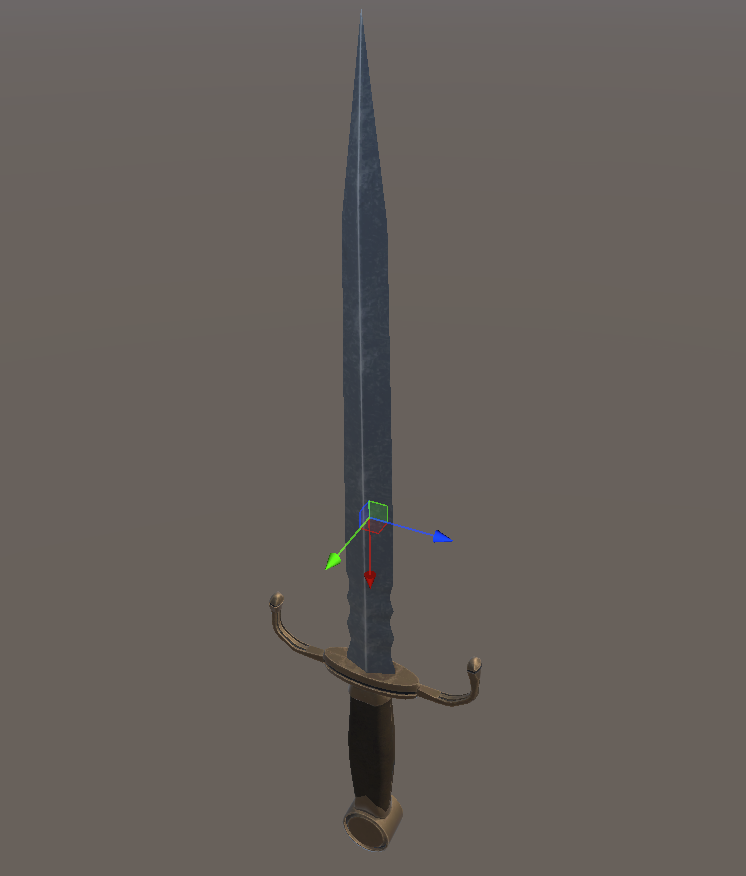
The Preview script is the component used to create an image preview of your item. You can scale the size of the preview box (visible by its gizmo) to change the frame to fit your weapon perfectly, as well as rotate the box for it to look nice.
This is usually used at the end of the weapon creating process, which will be mentioned in the Preview Section.
SpawnPoint
The SpawnPoint determines the point where the item will spawn, whether it be the spawnpoint for the ItemSpawner, or the rotation/center point of the item when you spawn it from the book.
For spawning the items via the spawn book, the rotation/position may depend on the map spawner rotation/position.
Adding the neccessary components
Now that your base item is completed, the next step is to add the other components that are important to creating an item. This includes the item doing damage, being able to be held, and being imbue-able.
Colliders and Damagers
The first step is making sure that your item can both deal damage as well as be able to collide with things, as well as make sure that it does not fall through the ground when you spawn it.
The first step is to create two empty gameobjects. Name one “Blades” and the other “Blunt”. On both of these, add the ColliderGroup component. This ensures that the game knows how to damage enemies, as well as allows you to imbue your item.
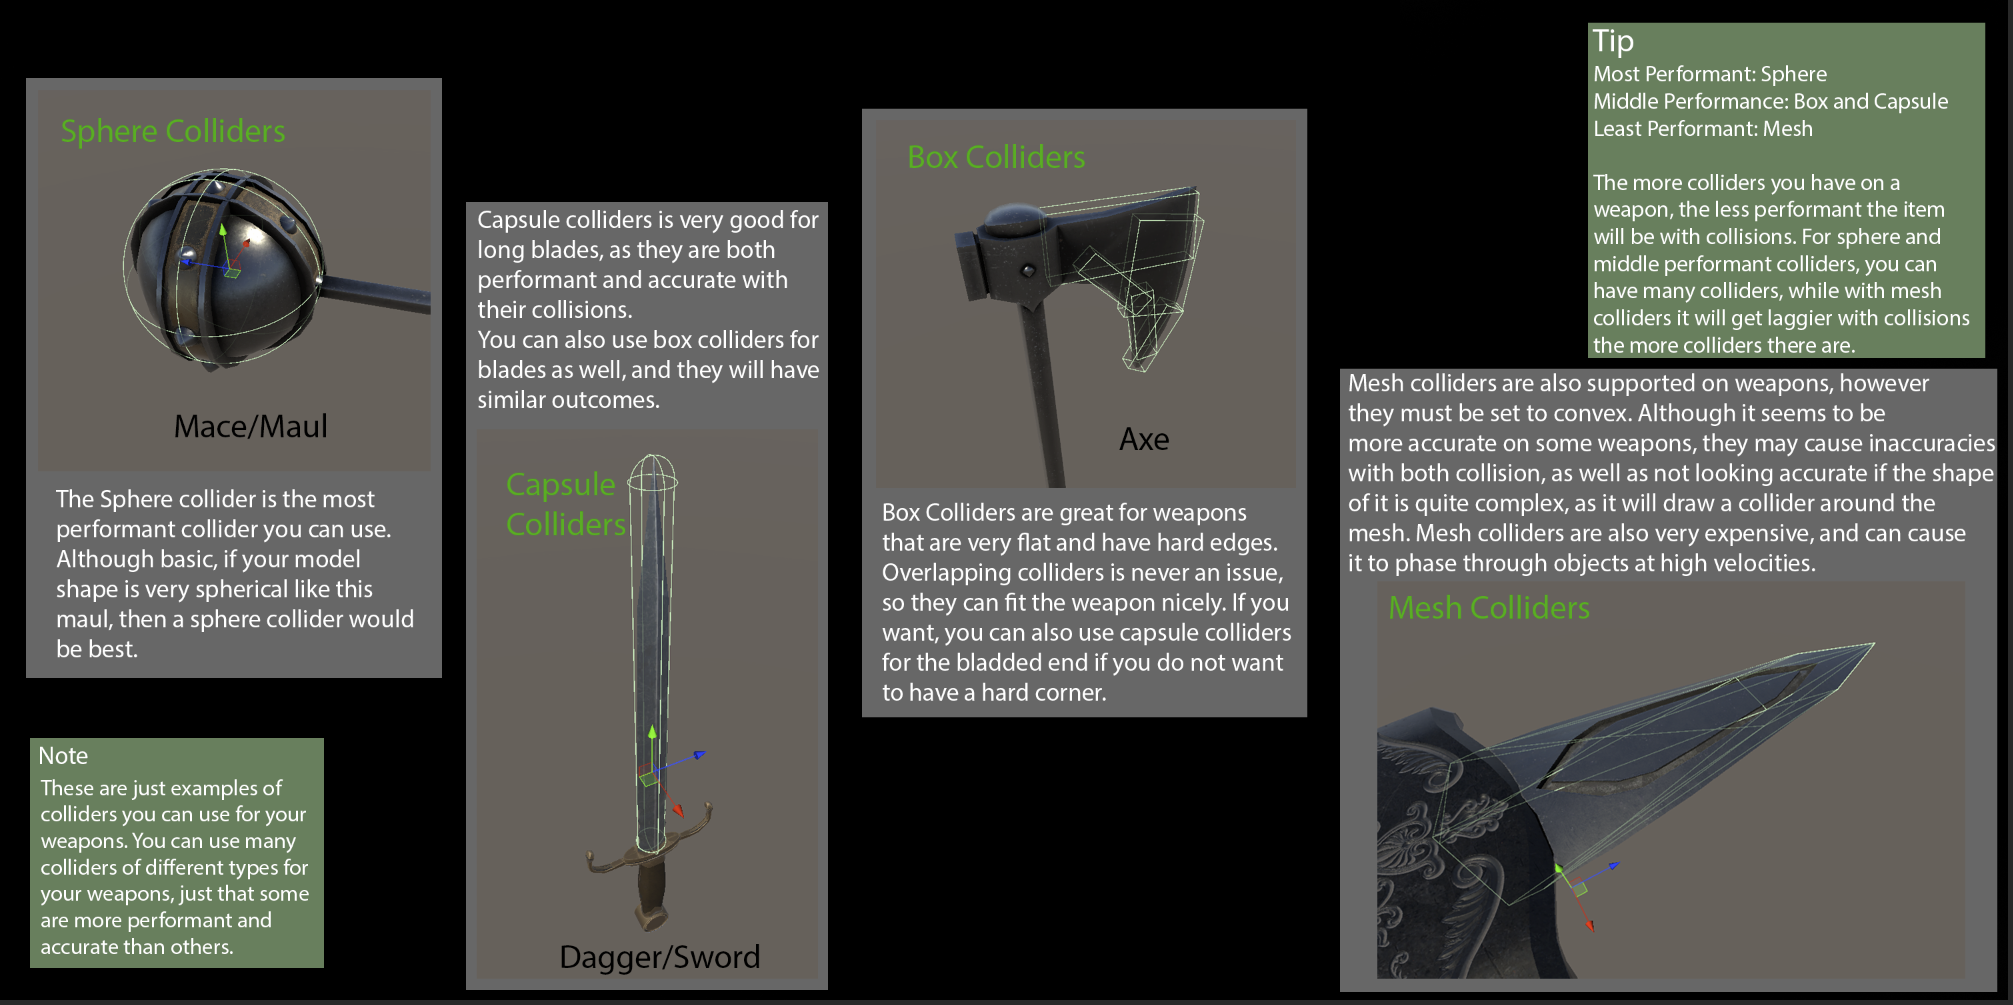
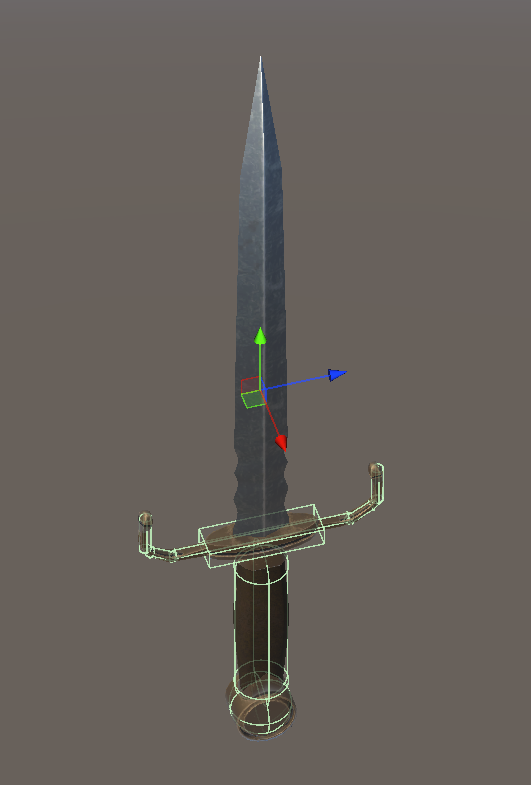
Next is to create colliders. Under the Blades gameobject, add an empty as a child of it, and start to build your colliders to fit the blade of your weapon. Here is a quick diagram of different colliders, as well as how to set them up correctly for different types of weapons. For the colliders on blades, it is best to set the physics material to Blade or Wood.
After you have set up the colliders for the Blades, do the same for the handle colliders.
The next step is adding damagers. There are three different types of damagers:
- Blunt : Does blunt damage, when hit with a blunt object, such as a handle or maul
- Slash : Can slash, cutting with a sharp edge, as well as embed like an axe.
- Pierce : Can pierce objects and creatures with the tip of the blade to the bottom.
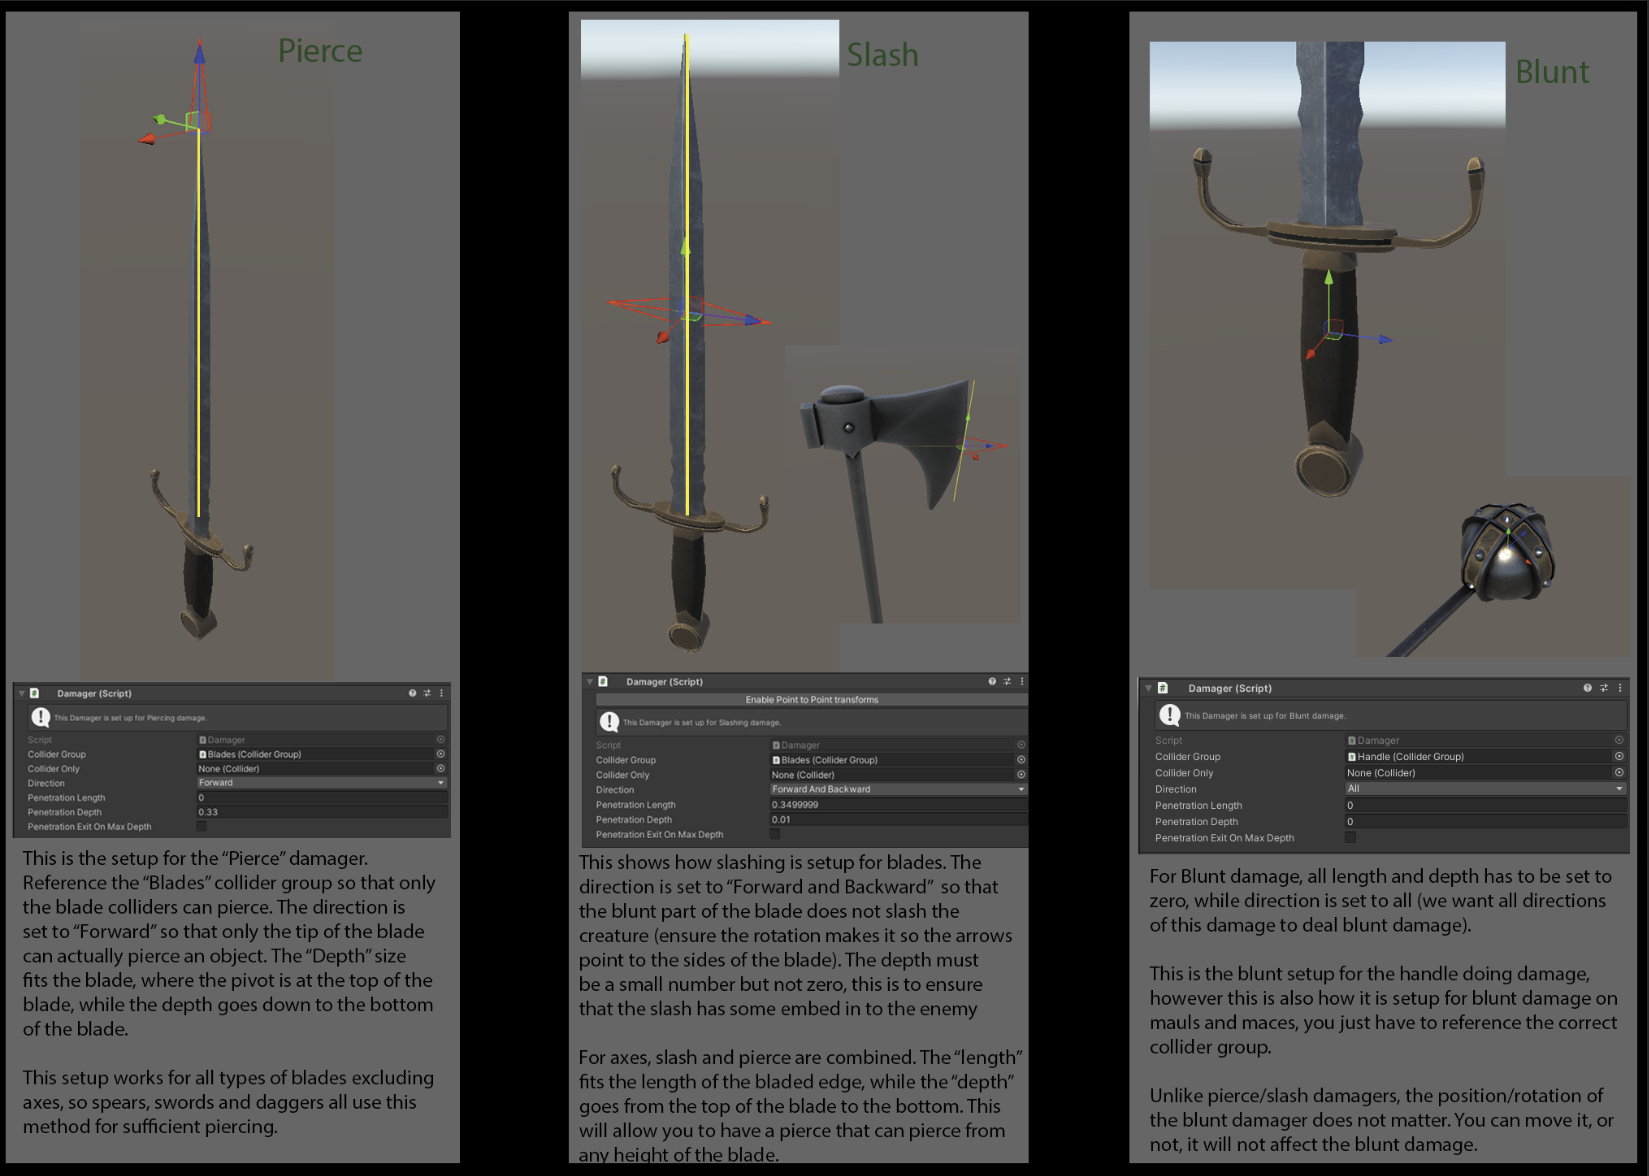
For a normal sword or dagger, you will use all three types of damagers. Slash and Pierce for the “Blades” collider group, and “Blunt” for the handle collider group. Ensure that these damagers are named accordingly, to make it easier to create the JSON later on. Ensure that the “Collider Group” section of the damager references the correct one. You’ll want the blade colliders to do slashing damager and be able to pierce, while you dont want the dagger’s handle to also be able to slash enemies.
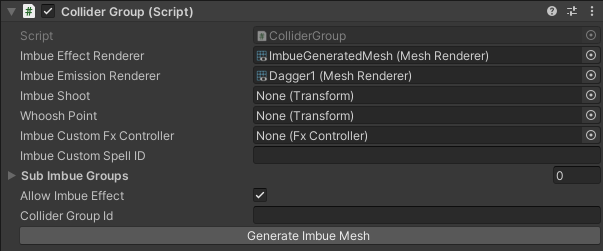
Finally, once that is all done, go back to your Blades collider group. Assign the mesh of the dagger to the “Imbue Emission Renderer” by dragging the mesh gameobject on to it, and then press “Generate Imbue Mesh”. This will create a pink mesh from your colliders to use to simulate VFX for imbuing weapons. It will generate an ImbueGeneratedMesh gameobject. Go on to it, and untick the box next to “Mesh Renderer”.
ParryTarget
The parry target script is used for AI detection, showing the points on the weapon where an NPC will try to avoid attacks from your weapon. You’ll want the AI to avoid all parts of your weapon, so it is best to extend it from tip of the blade to bottom of your weapon.

Handle
The next step is adding handles. Handles are essential for being able to grab your weapon, as well as being able to use telekinesis only, for items like big props.
Add an empty game object and call it Handle. Once done, add the Handle component on to it, and move the gizmo to the handle of the weapon. For weapons that have a long handle, you can increase the Axis Length field, and drag from point to point to fit the handle length. For one-handed weapons, this can stay at zero.
Once the handle is created, you’ll want to click the Calculate Reach button, as well as the Update to new orientations button. This will create Handle Pose orientations.
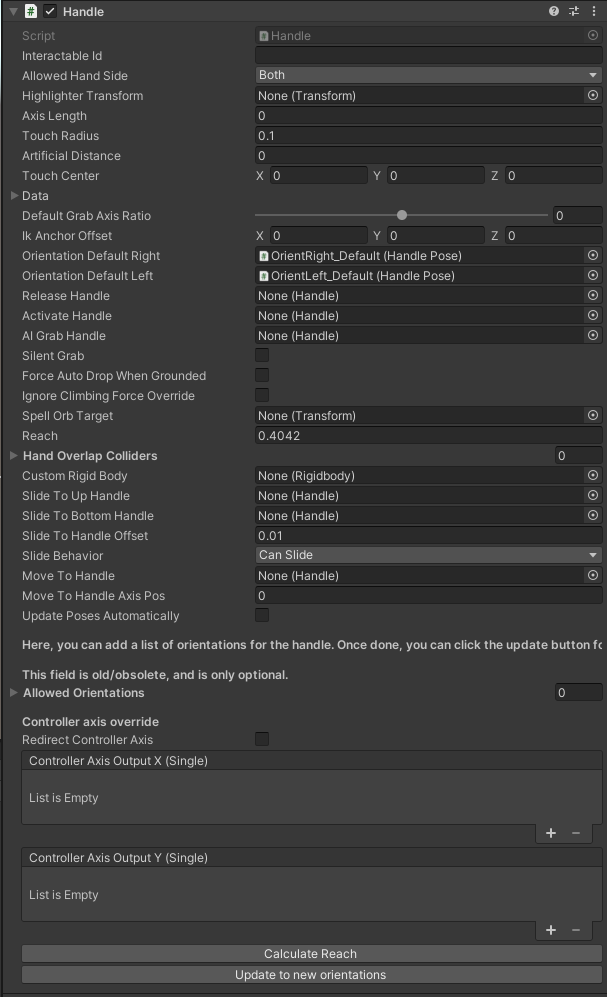
Once added, go to the main parent, to the item script, and drag the Handle you created to Main Handle Right and Main Handle Left.
Handle Pose
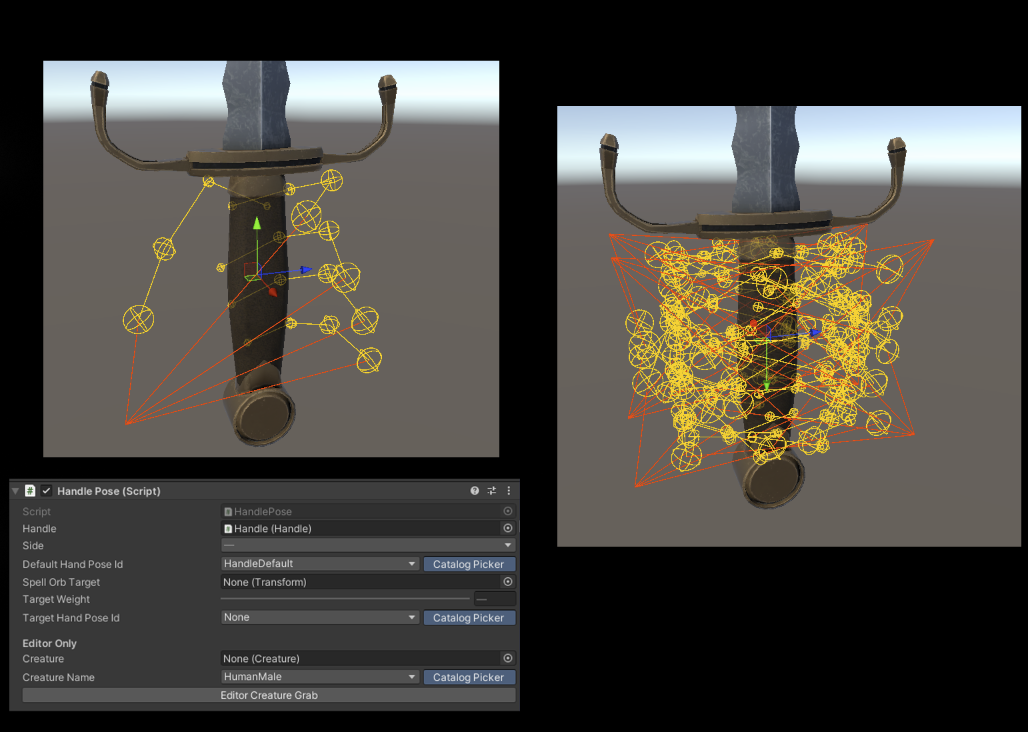
If you can’t see the handle pose gizmo, click “Catelog Picker” on the Handle Pose component.#
Next is to set up the poses for the handles. For most handles, HandleSmall, HandleMedium and HandleLarge will suffice. Put either one (depending on weapon size) in to the Target Hand Pose Id of the created handposes, and set the Target Weight to 1, or slide it to where the handlepose fits the handle well. Ensure to do this for both of the orientations.
Once complete, duplicate both handle poses, and rotate it 180 degrees on the Y Rotation, so that you can hold this item the other way. Then, copy all handle poses again, and rotate them all 180 degrees on the X axis, so you can hold it upside-down. Now, you should have 8 hand poses, where there is 4 for each hand, where the orientations are Forward, Backwards, Upside-Down Forwards and Upside-Down Backwards.
Whoosh
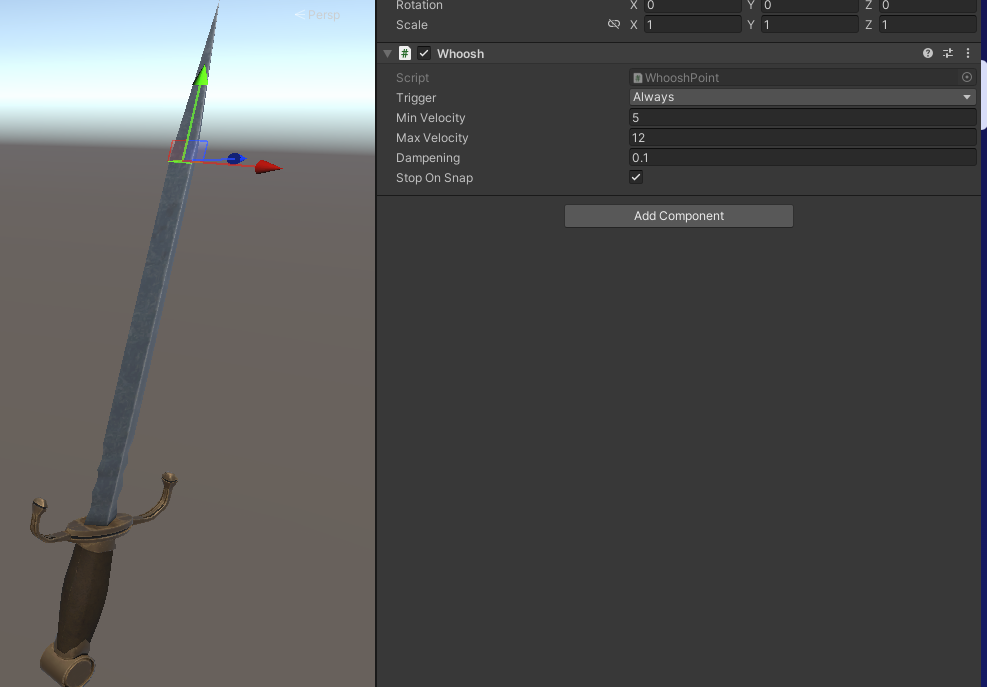
The “Whoosh” is the game object that creates the swinging sound when swinging the weapon. Add an empty gameobject and call it “Whoosh”. Drag it to the point that you want the sound to be played (usually on the blade) and add the Whoosh component on to it. You do not need to edit any of its’ fields.
Addressable
Finally, your weapon is now usable. You just need to add it as an addressable. The first thing you will want to do is to make the dagger a prefab. Go to the folder you want the dagger to be located, click on the main parent (where your Item script is located),and drag the parent down in to the folder. The dagger in the hierarchy will now be blue, which is known as a “Prefab”.
Next, go to ThunderRoad (SDK) > Addressables Groups and you will see the Addressables Groups window. Right click on this new window, and click Create New Groups > Packed Assets. Name this Packed Asset in to what you want to name your mod, and drag your Dagger prefab under this new asset. In the Addressable Groups, rename the dagger addressable to something unique. For this example, the dagger has been named WeaponGuide.Weapon.Dagger. Then, set the Labels on the right-hand side to “Windows” and “Android.

Preview
Finally, we get back to the preview script. The preview script will create an image of your item to use in the item book. There are two types of preview:
- Preview : Used for the main preview when you click on the weapon in the book
- Preview-CloseUp : Used for the mini-preview of the item in the categories. This will fall back to the
Previewif the closeup does not exist. CloseUp is not required,
Because we have already done the Addressable Groups, the item preview will automatically create their own once generated.
Go to the preview script, and scale it to the size of the weapon, and rotate it as you please.
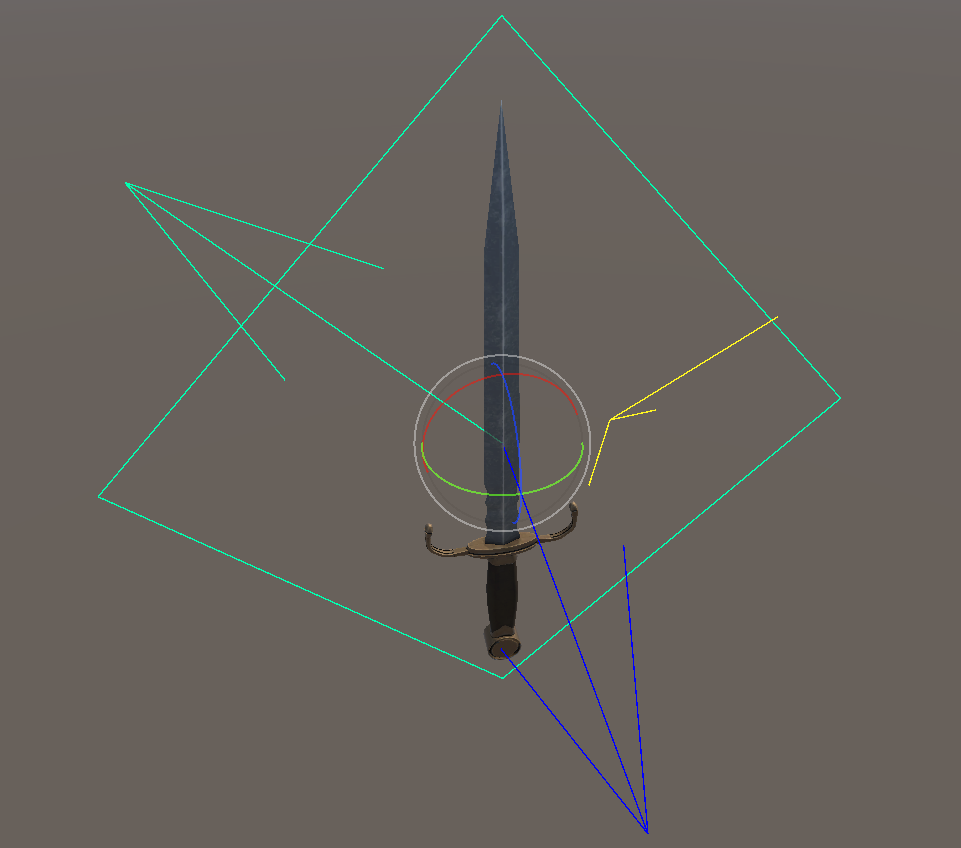
As seen in this image, I have rotated the preview 270 degrees to put it at an angle. The blue arrow points to the camera, so when you capture the preview, it will take it from that side. Now that your preview is correct, you can click on “Generate Icon” and it will generate a preview image for you.
If you want a close-up icon, simply copy and paste the preview script, and tick Close Up Preview in the component, then generate a preview again. It will create a separate image.
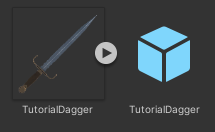
Because your item is a prefab, you can either copy and paste the preview script in prefab view (by clicking on the prefab), or do it in the scene, and then Go to the Parent > Overrides > Apply All. You’ll want to do that if you change anything about the prefab in the scene.
Exporting Your Mod
Finally, you now must export your mod to Blade and Sorcery.
Go to ThunderRoad(SDK) > Asset Bundle Builder, It will open the window needed to be able to export your mod. Click the Create New Asset Group, and it will create a new Asset Bundle Group in the list. Click on your new group, and view it in the inspector, by clicking on it in the Project.
You can move this Asset Bundle Group to anywhere in your project, it will still be visible in the Asset Bundle Builder.
In the Asset Bundle Group in the inspector, change the folder name to the name of your mod. Then, under the Addressable Asset Groups list, click the plus and add your Addressable Asset Group, it will be the name of your mod that you named the packed asset to when creating the addressables. Make sure Is Mod is enabled, and next is to create your Manifest.
The Manifest is a JSON used for the mod to be read as a mod by Blade and Sorcery. It will display all the information in the in-game mod loader.
Change the mod name, description, author and mod version to what you please. You can also add a Thumbnail PNG, but this is optional.
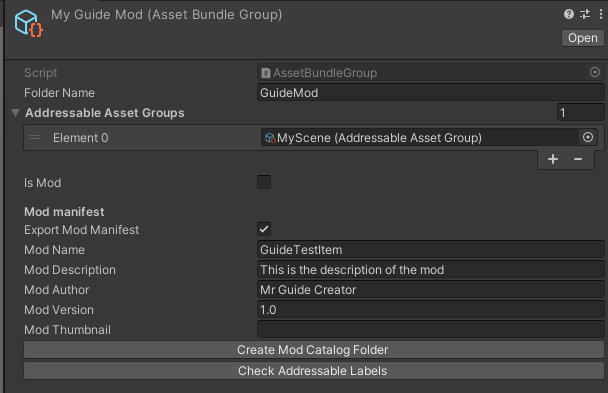
Now, go back to the AssetBundle builder, ensure that the Game executable path is set to the location of the Blade and Sorcery .exe file, tick the boxes next to your asset bundle group that you want to export, followed by the box next to Export next to your mod, and press Build asset bundle group(s) selected.
Building the asset bundle may take time, and may be resource heavy. Make sure that your device is properly cooled, so that it does not overheat during this process.
Once the building is complete, go to the Blade and Sorcery Directory > BladeAndSorcery_Data > StreamingAssets > Mods and you should be able to see your folder there, with the files inside.

JSON
The final thing needed for your mod is the JSON, to tell the game the information required for your weapon to do anything.
In your Blade and Sorcery SDK, go to the directory, and find the Catelogs folder, under SDK > BuildStaging > Catelogs > Default > bas. Here, you will find every json used in Blade and Sorcery. Grab a JSON from the Items folder that suits your weapon (e.g. DaggerCommon for a dagger) and copy it in to your mod folder. Rename it something relatable to your weapon, and start to edit the file with a text editor of your choice.
Inside the JSON, edit the ID to something unique (so it does not conflict with other weapons/mods). Change the “localizationId” to something unique, then change the Display Name, Description and Author to what you please.
Next, go to prefabAddress. In here, you will want to put the addressable name for your weapon here (like WeaponGuide.Weapon.Dagger). Do the same for the iconAddress and closeUpIconAddress, but change the addressable to the Icon addressable (like WeaponGuide.Weapon.Dagger.Icon or WeaponGuide.Weapon.Dagger.IconClose).
If your item does not have a close-up icon, under the closeUpIconAddress, remove the quotation marks, and set it to null,.
Next, set the “Slot” to a slot that makes sense for your weapon. Examples are:
- Small (for small daggers, axes etc)
- Medium (for longswords and shortswords)
- Large (for greatswords and mauls)
Next, set the mass and drag to something that makes sense. For example, for a dagger, a mass of 0.8 and a drag of 1.0 should be sufficient.
Finally, scroll down to the damagers and interactable section. If you copied a JSON that is similar to your weapon, then you may not need to touch it. However, ensure that the transformName matches that of the names of the game objects you created in Unity. For example, the Pierce damager you created should be called Pierce in both Unity and in the Damager section of the JSON.
For more information on the Item JSON, see Item JSON Documentation
Finally, your weapon should be complete. Load Blade and Sorcery, and look in the item spawn book for your item. It should be in the category set in the JSON, so if you changed it to Daggers, it will be in the Daggers category.
– Coming Soon –
- Recommended Components (Price Tag, Additional HolderPoint etc)
- Best Practises